Windows 10 Hidden features (2021)


By The Tech Uzaif on Jan 2, 2020

Windows 10 Hidden Features (2021)

     Understanding the display settings for Windows 10

Setting up a multi-display environment on Windows 10 is incredibly simple. When you connect a second display to your PC, Windows automatically detects the display and displays the desktop UI.

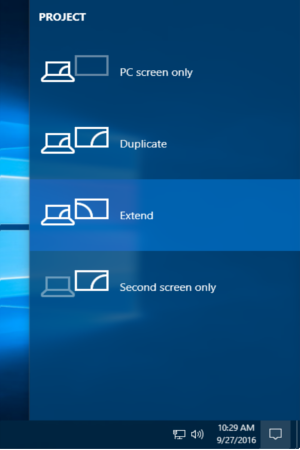
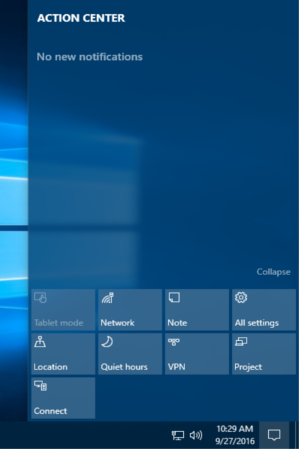
In this case we opened the multi-display function from the desktop UI by selecting the OS “Project” menu. From the taskbar, click on the Action Center (bottom right of screen) and select “Project,” or if you want to use the shortcut keys, press the Windows Key and P key and the “Project” menu will appear. There are four types of display methods that can be chosen. If you want to expand the desktop UI over two screens, select the “Extend” option.

  • PC screen only: used only to view the original display unit – the additional unit will be blank
  • Duplicate: used to display the same image on both displays
  • Extend: used to extend the desktop UI across the two displays; making your computer screen ‘longer.’
  • Second screen only: used only to display the additional display unit – the original will become blank
Action CenterProject
Find the “Action Center” icon in the lower right taskbar, and click on the “Project” icon (left image). In the “Project” menu, out of the four options, choose how you want to display your monitors (right image) 


To further customize the expanded screen, right click on the desktop and select “Display Settings” to open the “Project” menu of the system.

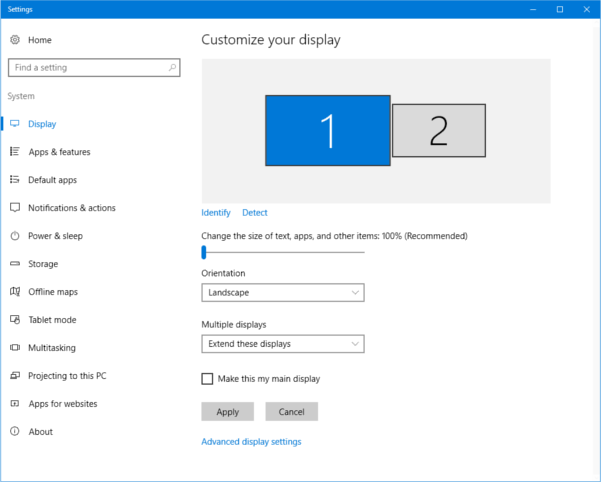
From here the two screens’ position relative to each other, display size such as text (expansion rate), display orientation, the previous four display method settings, and the main / sub-display monitor settings can be changed. Additionally, if you cannot see your connected display, click on “detect” to try to find the display (if this doesn’t work we recommend reconnecting the cable and/or restarting your PC).

In the enclosed grey squares [1] and [2], the position of the two monitors relative to each other is displayed. It’s best to drag these two squares to suit the actual position of your monitors.

These days notebook PCs equipped with very high definition displays of pixel densities greater than full HD are growing, but when these units are connected to external displays the character and icon sizes can vary significantly between the original notebook PC and external monitor, making it difficult to work with. If that’s the case, the “Change the size of text, apps, and other items” slider bar can be used to effectively adjust the display sizes close to the each other.
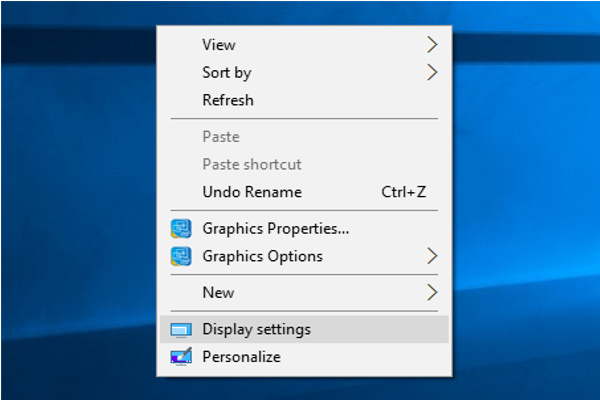
Right Click Desktop
When you right click on the desktop, select “Display settings.”


Display Settings
In the “System > Display” menu the screen position, display size (enlargement ratio), display orientation, display method of the multi-display, and main/sub display can be set. 


If you scroll down to the bottom of the “Display” menu there is an “advanced display settings” link. If you click on this, you can set the resolutions of the display monitors. Additionally, if you click on the “Advanced sizing of text and other items” link, you can change the settings for more detailed things like the size of items and text. 
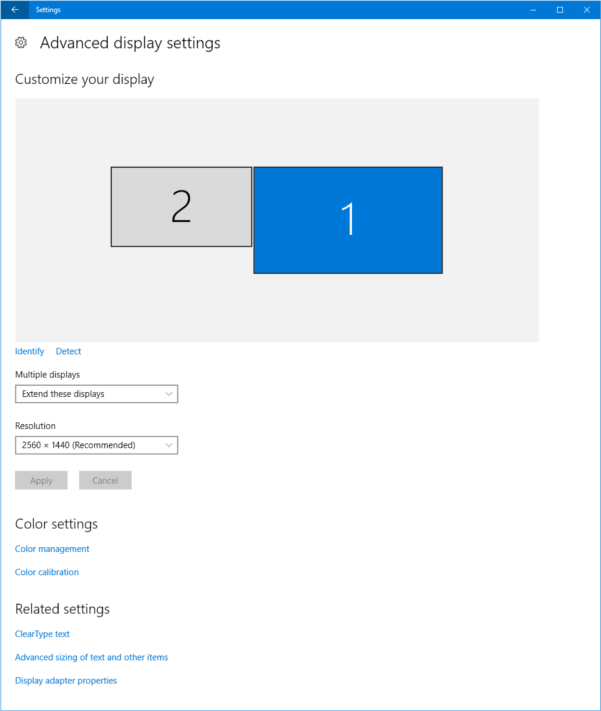
Advanced Display Settings
In the “Advanced display settings” menu, you can set the resolution of the display


As shown above, Windows 10 has a new settings application installed which we recommend you use. But you can also use the “control panel” found in Windows 8 and earlier. To any familiar PC user, the conventional method of using the control panel to display various settings is still possible.


 Personalize the Start Menu

The first thing you’ll probably notice in Windows 10 is the colorful and vibrant Start menu. What once was a button on the bottom of your screen has grown to become a full-screen experience with live “tiles” that show images and even advertisements.

If you love the new Start menu, great! You can head to Start > Settings > Colors, and customize the look of your new tiled environment, or head to the “Start” section and customize which apps appear in your grid.
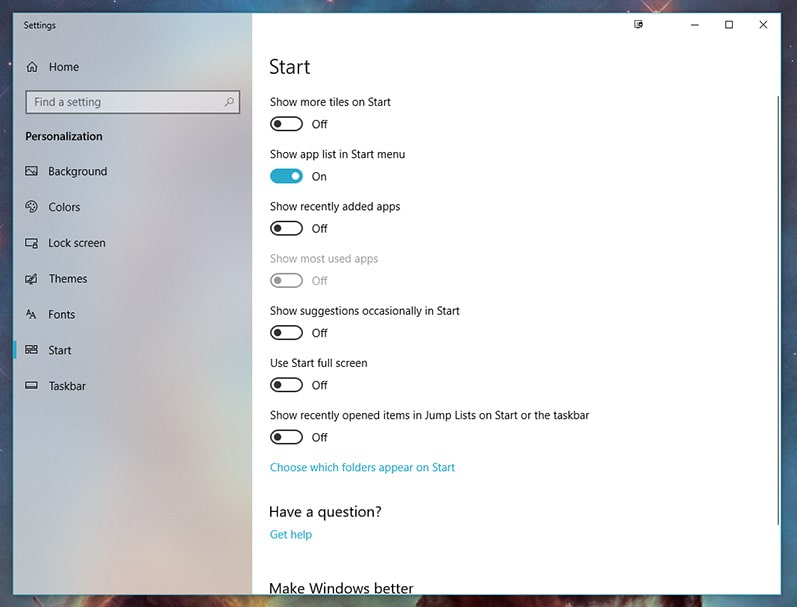
Start

If you’re more akin to the old Start menu, simply head in to Start > Settings > Start, and turn off every button, except “Show app list in Start menu.” This will bring back the more familiar menu we’ve become accustomed to.

customization of the Start menu in Windows 10 feels pretty much limitless. Whichever configuration you prefer, be sure to head to “Choose which folders appear on Start” in the settings menu. You can personalize which folders you have easy access to, providing quick access to your most-used folders.


 Search, Without Cortana

The search feature in Windows 10 is absolutely the most useful tool on the entire OS. No longer just meant to help you find a misplaced file, the search is integrated into systems menus as well. Simply start typing from the taskbar, and Windows will get you what you need.

This means no more digging through five sub-menus just to figure out how to change your account picture. Even in system folders like Settings, you’ll be immediately greeted with a search bar. Type in what you’re looking for, and get instant results.
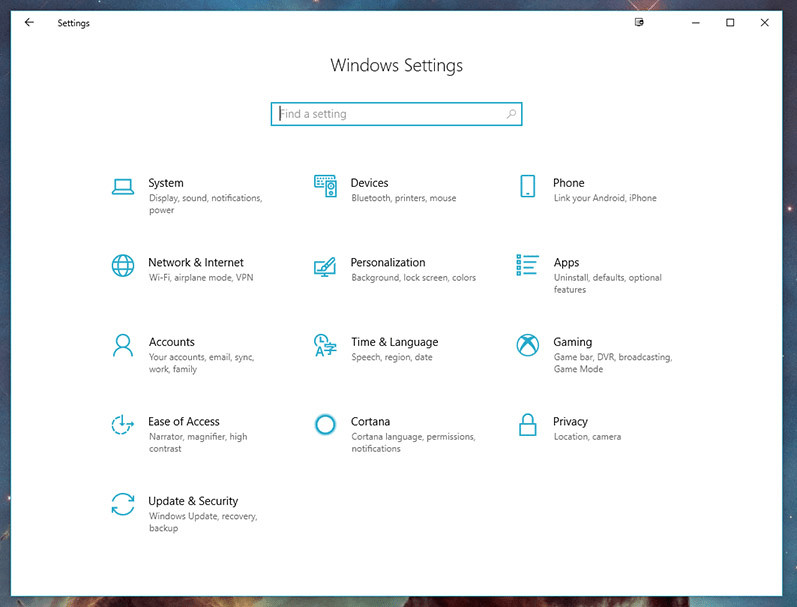
SettingSearch

Windows is pretty good at guessing what you’re searching for. For example, type in “desktop” and you’ll be given options about your desktop theme, remote desktop, and color personalization.

Of course, the usual Windows Explorer search is also still around, ensuring that you can find that misplaced file from within the Documents folder as well.

NOTE: With the upcoming April 2019 update, Microsoft’s virtual assistant,cortana, will be separated from search. As of this post, searching from the taskbar beside the Start menu will bring up Cortana, asking if she can help with anything. You can simply ignore this feature, type what you need, and bypass the unnecessary assistant for now!


 Use Focus Assist to Keep You On-Task

We’re always being interrupted from our work. Notifications pop up at random intervals to pull our attention away from what we really need to be doing. Focus Assist is here to keep us on track.
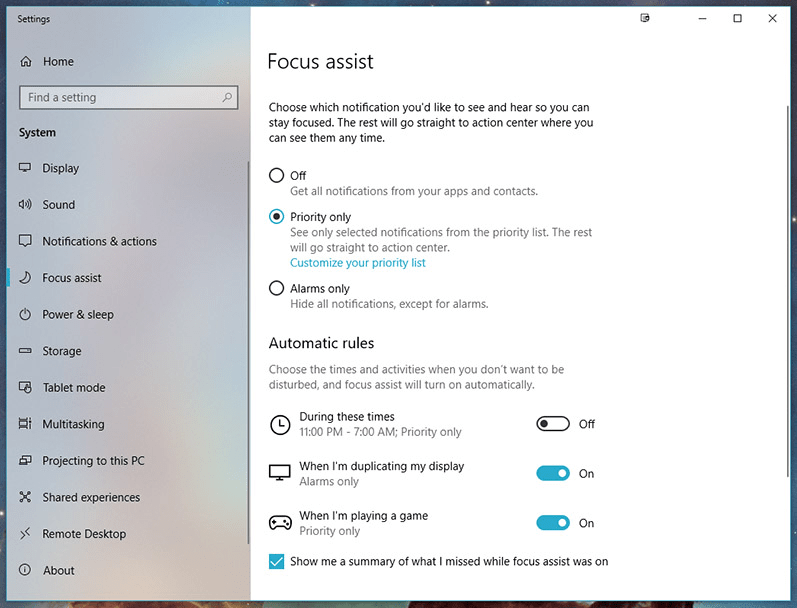
FocusAssist

Focus Assist can be found under Settings. The no-interruption software can be configured to turn on automatically during certain hours, or when you’re duplicating your display, helping prevent embarrassing notifications during your important presentation.

Some contacts will need to get through no matter what you’re focusing on. We’ve talked about the importance of configuring VIP on your  phone, and you can do something similar for your PC with Focus Assist.

Under Focus Assist settings, we recommend selecting “Priority Only.” Beneath this option, you’ll see “Customize your priority list,” where you can select the important people and even applications you want to receive immediate alerts from. Everything not on this list will be pushed aside until you’re ready to turn your focus to distractions.

Your action center will show you a summary of what you missed while Focus Assist was enabled whenever you’re ready to let your mind wander. Keep those distractions under control!


Use This feature Most of Windows 10

We’ve chosen our three favorites, but there are so many new features to explore in Windows 10, especially for those acquainted with older version of Microsoft’s OS. Here are some other features to check out.

  • Cloud Clipboard – Seamlessly copy and paste text, links, and pictures across multiple devices. Simply login to any Windows 10 machine, and your cloud clip board will follow you anywhere!

  • Windows Defender Security Center – Windows Defender provides great anti-virus protection at no cost, and the security center gives you complete control and visibility of your machine’s health. One screen allows you to find out if any actions are needed regarding firewall, account, or device security
  • Dark Mode – Do you work late at night or early in the morning? The bright monitor you’re staring at can cause headaches and eye strain. Under Settings > Color, you can select “dark” as the default app mode. This will allow most applications to use black and gray hues where white was originally. A much-appreciated feature for us morning birds!


The transition to Windows 10 can be daunting, but the upgrades are absolutely worth the learning curve! If you’re interested in learning more and getting some advice from the pros, check out our webinar, “Windows 10: Easy Tips for a Smooth Transition.

 the tech uzaif 


Best hidden features, tips, and tricks for Windows 10


  • Best hidden features, tips, and tricks for Windows 10

Start Menu Clip Windows 10


Now that Windows 10 is out and millions of people are already running it, let’s take a look at some of the best hidden features, tips, and tricks in the operating system. If you’re still on the fence, take note: You really do want Windows 10, despite a lot of the gripes we’ve shared over the past several months. It’s worth getting on the list for (or downloading the Windows 10 ISO directly). It combines the best of Windows 8 — super-fast startup, improved security — with much of what made Windows 7 familiar and easy to use, and without trying to force you to buy a touch screen or learn a whole set of hidden UI gestures.

And if you’re a computer nut like me, tweaking the OS is always the fun part. Discovering and implementing power user tips are my favorite part of getting a major new version of an OS. I still remember back when DOS 5.0 came out, and I was running DOS 3.3, and I got to try all these new things to optimize my 286. (We’ve come a long way.) Nostalgia aside, here’s what you need to know to amp up your Windows 10 install and take it to the next level.

Windows 10 Virtual Machine

Task view and virtual desktops

One of the best things about Windows 10 is how it handles virtual desktops. The fact that it finally handles them at all, out of the box, is a great step, since Mac OS X and Linux users have had that capability for a long time. It lets you set up a series of tasks and windows on your desktop, your email and Twitter window on another, and a third for general Web browsing and research. To get started, click the Task View icon on the taskbar (immediately to the right of the Search box), or hold down the Windows key (abbreviated throughout as Win) and Tab. (Click to read more on Task View and Virtual Desktops.)

Configure privacy settings

When you’re first setting up Windows 10, make sure to select a Custom install so you canmodify the privacy settings, instead of going with the Express install. (If you already installed it, no worries; you can fix it all in Settings). Otherwise you’ll find yourself agreeing to all sorts of private data sharing — and while Windows 10 is free for Windows 7 and Windows 8 users, it’s not a free product in and of itself — so there’s no reason to share your personal information when it’s not required.

Print to PDF

You can finally print a document (or rather, save it) as PDF without using a third-party utility. This makes it much easier to save and distribute documents that aren’t easily modified. Another long overdue feature makes it in under the radar.

Make sure WiFi Sense is off

You may feel differently about this, but I certainly don’t like the idea of allowing access to my WiFi network unless I specifically give out the password. Here’s how to make sure your computer isn’t doing that — and if it is, how to turn it off.

Run it in a virtual machine

If you’re thinking of taking the Windows 10 plunge, but don’t want to disturb your machine that’s currently running just fine, here’s how to install Windows 10 in a virtual machine first. Note that this is different than the virtual desktops I mentioned above; it’s virtualizing the entire OS within another OS (your existing one).

Explorer Home Tab Quick Access Windows 10

Windows Explorer Home tab and Quick Access

Windows Explorer windows are a lot more useful this time around, thanks to a new Home tab (pictured above). It makes file copies a cinch. If you look at the top left of the window, you’ll see a new Quick Access group that lets you navigate to recently accessed folders. That makes it much easier to maintain a fast workflow as you navigate around your computer’s file system.

Start Menu Clip Windows 10

Customize the Start Menu

The new Start Menu is such a huge improvement over what came with Windows 8.1 that it’s almost impossible to describe the relief. It combines the best elements of Windows 7 and Windows 8. And it’s also fully customizable. I admit the first thing I did is unpin all of Microsoft’s tiles and then shrink the size of the menu so it looks a lot like Windows 7 (pictured).

For a while, during some of the Windows 10 Technical Preview builds, you could pin the Recycle Bin to the taskbar, which makes it a bit more like OS X. Unfortunately, that functionality seems to be gone in the release version, though you can still pin it to the Start Menu as a tile.

Command prompt tweaks

A lot of Windows 10 utilities underneath the service still look the same as they did in Windows 7 and Windows 8. But one of the hidden tweaks is in the Command Prompt — head over to Properties and you’ll suddenly find you can enable a host of customizations, including a transparent background, resizing the window, and word wrap.

Battery saver

If you’re on a laptop and your battery is running low, Windows 10 is smart enough to begin throttling back background services and other threads so that you can squeeze the last bit of battery life out of your machine. To enable Battery Saver, click the Start menu, and head to Settings | System | Battery Saver.

Background scrolling

Ever notice how when you hover your mouse cursor over a window and try and scroll, you still can’t, because the window wasn’t active? Turn this feature on in Settings | Devices | Mouse and Touchpad and you’ll be able to do just that.

Keyboard shortcuts

Here are some keyboard shortcuts you may want to be aware of — ones that will really help your daily workflow:

  • Windows Key-Tab (Task View)
  • Windows Key-Right-Up (Moves app to top right quadrant)
  • Windows Key-Ctrl-Left or Right (virtual desktop)
  • Windows Key-Ctrl-D (new virtual desktop)
  • Windows Key-Ctrl-C (Cortana listening)
  • Windows Key-S (Daily Glance for weather, news, sports)
  • Windows Key-Ctrl-F4 (closes virtual desktop)
  • Windows Key-Up and Down (snap apps to top or bottom of screen or maximizes)OneDrive

OneDrive integration

Free cloud storage is a godsend these days, and Microsoft makes it super easy in Windows 10 with OneDrive. You can use it to store files for mobile device access from iOS or Android, and you can even set it to let you access any file on your PC remotely — not just the ones you drag over to your OneDrive folder.

Xbox Streaming

Windows 10 finally shows some real Xbox integration, and you can use it to log into your Xbox Live account. But more importantly, you can use it to stream Xbox One games locally on your PC. You’ll have to enable it first on the Xbox One under Settings | Preferences | Allow game streaming, and then on the PC in the Xbox application. (Interestingly, Microsoft is also going the other way and adding keyboard and mouse support to the Xbox One — not that you’ll need that, since you’ve already got a PC.)

Control Panel Windows 10

Find the original Control Panel (and other goodies)

The new Settings panel is easy to navigate and makes more sense than the crufty old Control Panel, but you’ll still need the latter to access some deeper options in the system. It’s easy to call up, even though it’s hidden; just right click on the Start button on the bottom left of the screen and choose it from the pop-up menu, or type Control Panel in the Search bar at the bottom left in the taskbar. When you right-click the Start button, you’ll see all kinds of useful things there, such as Computer Management and Disk Management; for what it’s worth, those options bring you right back to the familiar Windows 7-style apps in each case


My FIRST Blog post (introduction)

Today I am very happy, This is my 1st blog site of my life you need support, I have been thinking to write a blog for a long time but today I have started writing a blog  now I am writing my 1st blog.

Because today is my first day in the blog page , so I will post about myself.


      My name is Uzaif Umar   

    I'm currently a student of computer science

I'm from India is called the 'Land of unity in diversity' because it consists of varied culture,  customs etc.


 My hobbies are collect information about new technology, and playing games

spend timecollect informationplaying


My aim is to start my own  company or business.


                                                  thank you...


computer system security quiz 10 Answers

computer system security quiz 10 Answers | css quiz 10 ( all question and answer only for eduction purpose. )   Q:1. Which of the following ...